|
| Язык |
В настоящее время существует несколько компаний осуществляющих монтаж медной кровли в Киеве. При этом данные компании используют различную кровельную медь производства: Украины, России, Чехии и Германии. Наиболее качественной по утверждению многих специалистов является немецкая медь производства заводов KME.Крыша из меди – это признак высокого статуса в обществе, поэтому при ее монтаже должны использоваться материалы высокого качества, а также соответствующий уровень специалистов и оборудования. Медная кровля имеет срок службы свыше 150 лет и поэтому кровельная медь является практически вечным материалом. Медь кровельная проходит различные стадии окисления – от оксидированной меди до патины. Возможно при изготовлении кровельных элементов использовать медь уже готовой расцветки оксид меди и патинированную медь производства KME. Из кровельной меди могут быть изготовлены такие кровельные элементы как: медная шашка, медная чешуя, медная фальцевая кровля, элементы подшивки кровли, медная вагонка, медная лобовая доска, медная водосточная система.
Основание для кровельного покрытия из медных лент (листов) следует выполнять в виде сплошного настила из деревянных брусков или досок, а также из водостойкой фанеры или ОСБ. Толщину настила определяют расчётом на воздействие расчётной нагрузки с учётом шага стропил. На основание перед устройством кровельного покрытия можно укладывать подстилающий слой из рулонных материалов. Полосы таких материалов следует укладывать параллельно коньку с нахлёстом не менее 80 мм вышерасположенной полосы на нижерасположенную. Полосы материала подстилающего слоя прибивают к основанию медными гвоздями с шагом 120 мм.
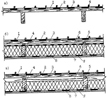
Над холодным чердаком выполняют вентилируемую кровлю, состоящую из уложенного на стропила основания, подстилающего слоя и покрытия из медных лент или листов (рисунок 1а). В утеплённой совмещённой кровле (рисунок 1б, 1в) слой эффективной теплоизоляции должен быть защищён:
- слоем пароизоляции, предотвращающей диффузию водяного пара в зимнее время из отапливаемых помещений и его конденсацию внутри конструкции; - слоем материала с низкой воздухопроницаемостью (противоветровой слой), предотвращающим фильтрацию воздуха, вызываемую ветром. Теплоизолирующие плиты необходимо укладывать так, чтобы плиты полностью заполняли полости по всей длине и ширине и чтобы не возникало щелей и воздушных прослоек между ними, а также между плитами и ограничивающими полости элементами конструкции крыши.
Полосы (листы) материалов, применяемых для устройства слоя пароизоляции и противоветрового слоя, должны укладываться в соответствии с инструкцией производителя.
Рисунок 1 - Варианты вентилируемых покрытий с кровлей из медных листов.
а - над холодным чердаком; б - над утепленным покрытием с одним вентиляционным каналом; в - то же, с двойным вентиляционным каналом;
1 - фальцевая медная кровля; 2 - подстилающий слой; 3 - сплошной настил из досок хвойных пород; 4 - стропила; 5 - дистанционный брусок; 6 - противоветровой слой из водоизоляционного паропроницаемого материала; 7 - теплоизоляция; 8 - пароизоляция; 9 - потолок.
В утеплённой совмещённой кровле для естественной вентиляции должны устраиваться входные и выходные отверстия. Входные отверстия (продухи) должны быть выполнены в виде сплошных щелей и располагаться на самой низкой точке крыши (карниза), а выходные - на самой высокой точке конька.Размеры входного отверстия устанавливаются из расчета 2 % от площади кровли (но не менее 250 см2 на пог. м), а выходного отверстия - 0,5 %. При установке на входных и выходных отверстиях металлических сеток от насекомых, ширина вентилируемой щели должна быть увеличена не менее чем на 45 %. В вентиляционных каналах длиной более чем 15 м могут образовываться застойные зоны, в связи с чем их необходимо делить на отдельные секции. Высота поперечного сечения вентиляционного канала над теплоизоляцией должна быть не менее 5 см.
Не допускается сужение канала, наличие в нем преград и изменение его направления, т.к. это снижает эффект естественной вентиля ции и может привести к накоплению влаги. В случаях, когда невозможно устроить вентиляцию кровли, допускается устройство невентилируемой утеплённой совмещённой кровли (рисунок 2).
Рисунок 2 - Не вентилируемое покрытие с кровлей из медных листов.
1 - фальцевая медная кровля; 2 - подстилающий слой; 3 - сплошной настил из досок хвойных пород; 4 и 5 - слои теплоизоляции; 6 - стропила; 7 - пароизоляция; 8 - потолок.
Материалы, применяемые для устройства медной кровли:
Для устройства кровли применяют листы медные ГОСТ 495 и ленты медные ГОСТ 1173 из меди марок М1р, М1ф, М2р, М3р, М2 и М3 по ГОСТ 859. Медь в листах и лентах относится к мягким матери алам с регламентированной величиной зерна. Поверхность лент должна быть чистой, края ровно обрезаны и не должны иметь зна чительных заусенцев. Серповидность лент не должна превышать 3 мм на I м длины. Физико-технические свойства материала листов и лент приведен в таблице 1.
Таблица 1
| Наименование показателя, ед. измерения | Величина показателя |
| Временное сопротивление МПа (кгс/мм2) | 200-26 (20-27) |
| Относительное удлинение, не менее % | 36 |
| Твердость по Бринеллю | 55 |
| Коэффициент линейного расширения, мм/м | 1,7 |
| Масса 1 м2 медной ленты, кг | 4,90 |
Основные геометрические параметры лент приведены в таблице 2.
|
Толщина, мм |
Ширина, мм |
Предельное отклонение по толщине лент, мм | Предельное отклонение по ширине лент, мм | Внутренний диаметр рулона, мм |
| 0,55 | 600 | ±0,08 | ±1,2 | 40¸ 500 |
Основание под кровлю.
Основание под кровлю выполняют из:
♦ брусков или досок хвойных пород (ГОСТ 24454) толщиной не менее 24 мм (в досках предусмат риваются шпунтовые соединения), хвойная древесина должна быть антисептирована;
♦ настила из атмосферостойкой бакелизированной фанеры ФБС и ФБС1 (ГОСТ 11539) толщиной 22 - 24 мм.
♦ настила из ОСП толщиной 9мм.
Устройство медной кровли
Соединение медных листов кровли (полос) в направлении поперек ската осуществляют с помощью стоячих двойных фальцев. Готовый фальц имеет высоту не менее 23 мм, выполняется путем соединения кромок смежных листов (рисунок 4).
Отгибы картин (лент, листов) для устройства стоячих фальцев следует принимать равными 20 мм для одной картины и 35 мм для другой, смежной с ней, картины.
Для возможности восприятия температурных деформаций медной кровли кромка одного из стыкуемых листов выполняется наклонной с обеспечением зазора не менее 3 мм (рисунок 5). Для крепления картин кровли к основанию применяют кляммеры (рисунок 6), которые закрепляют гвоздями к основанию и вводятся в стоячие фальцы (рисунок 4). На основных поверхностях кровли рекомендуемое количество кляммеров - 4 шт/м2 с шагом 400 - 500 мм. Для участков кровель, расположенных по периметру здания, количество кляммеров увеличивают до 5 шт/м2 и уменьшают шаг до 350 мм. Установка может осуществляться вручную специальными кровельными рамками или механизированно-фальцезакаточной машиной.
Рисунок 3 - Устройство фальцевого соединения.
а) изготовление кромок на листе; б) установка кляммера (скользящего кляммера) на основание и кромку листа; в) установка второго листа с отогнутой кромкой образованием двойного стоячего фальца
Рисунок 4 - Компенсационный стык
На скатах кровель длиной до 3 м применяют обычные кляммеры (рисунок 6), на скатах кровель длиной более 3 м подвижные кляммеры (рисунок 7) для компенсации тепловых деформаций медной кровли в направлении ската.
Рисунок 5 - Крепежные кляммеры, изготавливаемые механизированным (а) и ручным (б) способами
Рисунок 6 - Подвижный кляммер
Соединение медных листов (полос) в направлении ската осуществляют с помощью лежачих фальцев с введенными в них сплошными кляммерами, прикрепляемыми к основанию медными гвоздями. В зависимости от уклона могут быть предусмотрены;
♦ одинарный лежачий фальц для кровли с уклоном 25° (45 %) и более (рисунок 8,а);
♦ двойной лежачий фальц для кровли с уклонами от 16 (30 %) до 25° (45 %) (рисунок 8,6).
Отгибы картин (лент, листов) для устройства лежачих фальцев следует принимать равными не менее 25 мм.
Лежачие фальцы смежных листов должны располагаться вразбежку (рисунок 9).
Рисунок 7 - Лежачие фальцы
а) одинарный; б) двойной
Рисунок 8 - Расположение горизонтальных соединений и закрепление листов
1- подвижный кляммер; 2 - медные листы; 3 - одинарный лежачий фальц со сплошным кляммером
Устройство узлов и соединений кровли.
Карниз.
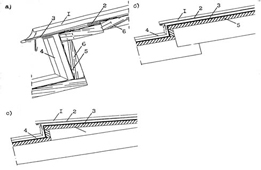
В настиле основания у карниза выполняют углубления не менее 5 мм под кронштейны для установка желобов на карнизе (рисунок 11). После установки и закрепления кронштейна к торцу настила прикрепляют гвоздями карнизные свесы из медного листа или полосы (позиция 1 рисунка 11). Отдельные карнизные свесы с максимальной длиной 3,0 м соединяют скобами (с зазором 3 мм) или нахлестом в 20 мм. Для закрепления свесов к торцу основания кровли используют медные кровельные гвозди 2,8x25 мм, располагая их в шахматном порядке с расстоянием между ними не более 100 мм.
Рисунок 9 - Конструктивные ступени покрытия
а) 1 - стоячий фальц со скошенными кромками; 2 - лежачий фальц со сплошным кляммером; 3 - карнизный свес; 4 - фальцевая медная кровля; 5 - подстилающий слой; 6 - основание под кровлю.
б, с) 1 - стоячий фальц с квадратными кромками; 2 - карнизный свес; 3 - подстилающий слой; 4 - фальцевая медная кровля; 5 - основание под кровлю.
Рисунок 10 - Установка водосточного желоба
1 - карнизный свес; 2 - подстилающий слой; 3 - полукруглый водосточный желоб; 4 - кронштейн водосточного желоба; 5 - медная кровля; 6 - основание под кровлю; 7- стена
Элементы карнизного свеса выполняют с короткой нижней консолью (рисунок 12,а) или удлиненной нижней консолью с желобочным профилем (рисунок 12,б), заводимым за отгиб водосточного желоба (рисунок 11).
Рисунок 11 - Карнизные планки с коротким вертикальным свесом (а) и длинным вертикальным свесом (б)
Стоячий фальц листов кровли на карнизе всегда должен быть доведен до края кровли (рисунок 13).
Рисунок 12 - Формы стоячего фальца у карниза
а и б) с квадратными кромками в) со скошенными кромками.
На изломе длинных скатов предусматривают разрывы в стоячих фальцах (рисунок 14,а), на скатах длиной до 3 м устраивают непрерывные фальцы (рисунок 14,б).
Конек.
Вентиляционный конек устраивают из отдельных секций, которые устанавливают в продольном направлении конька с нахлестом (рисунок 15).
Конек может отступать от фронтона (рисунок 16,а), сужаться к концу фронтона (рисунок 16,б) или высту пать за фронтон (рисунок 16,с).Высота конька должна быть не более 150 мм.
При устройстве невентилируемого конька в продольном направлении устанавливают медные кронштейны с шагом 400 мм, за которые закрепляют листы скатов кровли (рисунок 17). В продольном направлении секции конька соединяются в нахлестку, что обеспечивает надежность стыков и восприятие температурных деформаций.
Рисунок 13 - Разрывы в стоячих фальцах (а) и непрерывные фальцы (б)
1- стоячий фальц со скошенными кромками; 2 - подстилающий слой; 3 - карнизный свес; 4 - основание под кровлю
Рисунок 14 - Вентилируемый конек двухскатной крыши.
1 - обделка конька медным листом; 2 - медный кронштейн; 3 - лежачий фальц; 4 - подстилающий слой; 5 - фальцевал медная кровля; 6 - основание под кровлю .
Рисунок 15 - Варианты конечного участка конька на фронтоне.
Рисунок 16 - Тавровый фальцевый конек.
1 - стоячий фальц; 2 - медный кронштейн; 3 - подстилающий слой; 4 - основание под кровлю; 5 - секции конька
В такой конструкции стоящие фальцы, подходящие к конь ку можно располагать прямо друг против друга.
Примыкание кровли к стене.
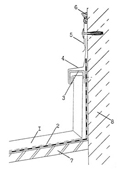
В местах примыкания кровли к стене листы (полосы) медной кровли заводятся на стену на высоту не менее 300 мм и закрепляется к ней медными кронштейнами. Над торцом листов устанавливают медный фартук водослива (рисунок 18). Край фартука перекрывается фасонным медным элементом с заполнением зазора в местах примыкания фартука герметизирующими составами.
Рисунок 17 - Примыкания медной кровли к стене


.jpg)
.jpg)
.jpg)
.jpg)
.jpg)
.jpg)
.jpg)

.jpg)
.jpg)
.jpg)
.jpg)
.jpg)
.jpg)
